Bathroom Ceiling Repair – Charlecote Park Hotel, Warwickshire
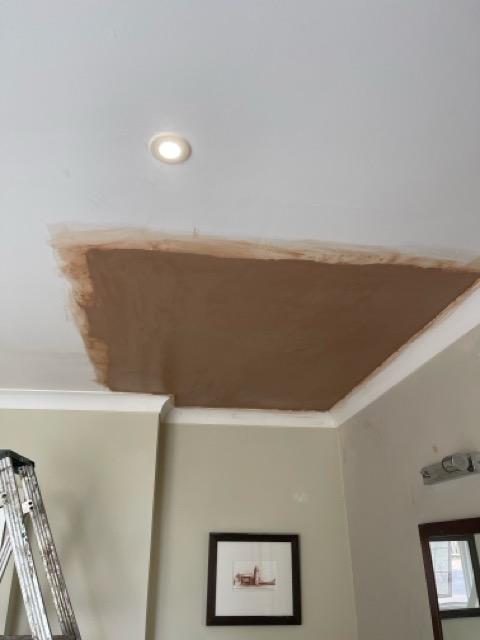
Cooper Plastering was recently called to Charlecote Park Hotel to repair a damaged bathroom ceiling that needed to be ready ahead of arriving guests. We reboarded and skimmed the entire area using plasterboard, scrim, PVA, and British Gypsum Multi-Finish plaster — achieving a flawless, durable finish that blended seamlessly into the existing ceiling. The job was completed within one day, with extra attention paid to keeping the work area clean and tidy, ensuring the room was ready for hotel guests without delay. The final result was fast, exceptionally clean, and perfectly smooth, leaving the hotel management delighted with the finish and turnaround time. If you’re looking for reliable, high-quality ceiling repairs or plastering services for commercial or domestic properties in Warwickshire, get in touch with Cooper Plastering today. 📞 07754 917258📧 info@cooperplastering.co.uk🌐 www.cooperplastering.co.uk
Ceiling Repair After a Leak – Alcester Road, Stratford-upon-Avon
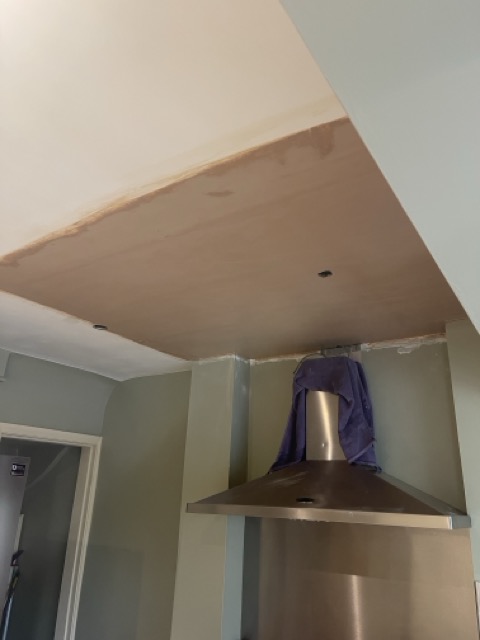
At Cooper Plastering, we were recently called out to a property on Alcester Road, Stratford-upon-Avon, to carry out a ceiling repair following a water leak. The affected area required a full reboard and skim to restore a perfectly smooth surface. We used plasterboard, scrim tape, PVA, and British Gypsum Multi-Finish plaster to achieve a long-lasting, professional result. Working above kitchen cupboards and the cooker hood, we took extra care to keep the area clean and tidy throughout. The biggest challenge was ensuring the new section blended seamlessly into the existing ceiling — but the end result was fabulously flat and smooth, ready for painting. This ceiling was completed start to finish in just one day, leaving the homeowner delighted with the quality and speed of the work. If you need ceiling repairs, leak damage fixes, or full re-skims in Stratford-upon-Avon or the surrounding Warwickshire area, contact Cooper Plastering today. 📞 07754 917258📧 info@cooperplastering.co.uk🌐 www.cooperplastering.co.uk
Plasterer Honeybourne

Transforming a Family Bathroom in Honeybourne – Artex Removal & Skimming by Cooper Plastering At Cooper Plastering, we take pride in helping homeowners achieve smooth, modern surfaces by removing outdated or damaged plaster and ceilings. Recently, we had the pleasure of working with Georgia and Dan, a hardworking couple who run a successful dog walking business in Honeybourne. They wanted to update their family bathroom, starting with the ceiling, which was covered in an old, spiky Artex finish. Tackling the Artex Ceiling Artex ceilings were once a popular design choice, but for many homeowners today, they can feel outdated and difficult to maintain. Georgia and Dan’s bathroom had a particularly tough case of Artex—thick, spiked, and heavily textured, making the removal process more challenging than usual. However, our experienced team at Cooper Plastering was well-equipped for the task. The process began with a thorough assessment of the ceiling. Due to the depth of the Artex texture, we opted to carefully knock down the high spots first to create a more even surface. Once that was completed, we applied a bonding PVA solution to the entire ceiling, ensuring the plaster would adhere properly and provide a smooth, flawless finish. Skimming to Perfection With the ceiling prepped and ready, we applied two coats of Gypsum Multi-Finish plaster, skillfully smoothing it out to eliminate any remaining imperfections. This technique results in a sleek, modern surface that is perfect for painting after 5–7 days of drying time. Once fully dry, Georgia and Dan can now choose their ideal shade to complete the transformation of their bathroom. A Speedy & Efficient Process One of the things Georgia and Dan appreciated most was the speed of our work. Many plasterers had told them this job would take two days, but thanks to our efficient methods and expertise, we were able to complete everything in just one long day. This meant minimal disruption to their home and business schedule, a key benefit for any busy household. Testimonial from Georgia & Dan “We were so impressed with Cooper Plastering! From the start, Andrew was professional, informative, and gave us a fair price for the work. The job was booked in quickly, and on the day, they arrived on time, worked tirelessly, and left everything spotless. The transformation of our bathroom ceiling is incredible – it’s completely smooth and looks brand new. We’re really happy with the result and would 100% recommend Cooper Plastering to anyone needing plastering work done. Fantastic service all around!” Get in Touch with Cooper Plastering If you’re in Honeybourne or the surrounding areas and need expert plastering work done, whether it’s Artex removal, ceiling repairs, or full room skimming, Cooper Plastering is here to help. We pride ourselves on our quality workmanship, efficiency, and competitive pricing. 📍 Serving Honeybourne, Stratford-upon-Avon, Evesham, Warwick, and all surrounding areas 📞 Call Andrew at 07754917258 📧 Email: info@cooperplastering.co.uk 🌍 Visit: www.cooperplastering.co.uk For smooth, professional plastering work with a top-rated service, contact us today and let’s transform your space!
Plasterer Southam

Renovation Success: Cooper Plastering Transforms a Shop in Southam When Dean took over a shop in Southam, he knew that extensive renovations were needed before he could open for business. Water damage had affected two downstairs walls, and the upstairs toilet, kitchen, and main working office/store room required significant work to be ready for use. Cooper Plastering was called in to tackle the job, ensuring the space would be fully refurbished and ready for a fresh start. The Renovation Process Over three days, our team at Cooper Plastering worked diligently to restore the shop’s interior. The process involved multiple steps to ensure a flawless and durable finish: Preparing the Walls: The downstairs walls had suffered from water damage, so we started by sanding back the affected areas to remove any loose or compromised plaster. Any holes left by the electrician were bonded to create a smooth surface, ensuring the final result would be seamless. We then applied two coats of high-quality plaster to achieve a smooth, even finish, making the walls ready for painting and decoration. Boarding and Skimming the Ceilings: The ceilings in both the toilet and kitchen upstairs needed complete boarding before being skimmed. Using high-quality plasterboard, we reinforced these areas to provide a solid foundation. We then applied a fresh skim coat, ensuring the ceilings were smooth and ready for final decoration. Final Touches: Once the walls and ceilings were skimmed, we meticulously tidied up, leaving the shop in pristine condition. The newly plastered surfaces are now drying and will be ready for painting and final decoration in just a few days. A Satisfied Client Dean was thrilled with the work and had this to say about his experience with Cooper Plastering: “I couldn’t be happier with the work done by Cooper Plastering. They worked efficiently over three days, ensuring minimal disruption and keeping everything tidy. The finish on the walls and ceilings is excellent, and I feel confident that my shop will look fantastic when it opens in a month. Highly recommended!” For those searching for expert plastering services in Southam, Cooper Plastering is the trusted choice. Whether you need a full renovation, wall repairs, or ceiling reboarding, we bring professionalism, efficiency, and outstanding craftsmanship to every project. Contact Cooper Plastering If you need expert plastering services, contact us today: 📍 Website: www.cooperplastering.co.uk 📧 Email: info@cooperplastering.co.uk 📞 Mobile: 07754917258 For top-quality plastering work in Southam and surrounding areas, choose Cooper Plastering—where excellence meets reliability!
Plasterer Long Marston

Historic Home Wall Repair in Long Marston – Cooper Plastering Preserving the character and structural integrity of older homes requires a careful approach, and that’s exactly what Cooper Plastering provided for Tim in Long Marston. His beautiful 500-year-old property had a damaged living room wall where the plaster had blown, leaving an unsightly and unstable surface. Tim wanted a specialist solution that would blend seamlessly with the traditional aesthetics of his home while also ensuring durability. The Challenge – Matching Traditional Materials Older properties come with their own unique set of challenges, especially when it comes to plasterwork. Using modern plasters can sometimes cause issues with breathability, adherence, and overall appearance. For Tim’s home, we recommended Limelight Heavy Impact Single Coat Fast Drying White Plaster. This product is specifically designed for older buildings, providing a breathable, durable, and high-impact finish that blends beautifully with historic properties. The Repair Process – Careful, Skilled, and Precise The first step was to carefully remove the old, blown plaster from the affected wall, ensuring that no further damage was caused to the existing structure. Once the compromised material was stripped back, we prepared the wall for the new application by cleaning the surface and applying a bonding agent to promote strong adhesion. Next, we applied the Limelight Heavy Impact Plaster in a single coat, skillfully troweling it to create a smooth and even surface while ensuring it remained in keeping with the existing plaster in the home. This specialist plaster dries white and is impact-resistant, making it the perfect choice for a property of this age and character. To finish, we carefully tidied the workspace, ensuring that no dust or debris was left behind. Our goal is always to leave a property looking as if we were never there—except for the beautifully restored wall, of course! A Happy Client – Tim’s Testimonial Tim was delighted with the work, commenting: “Cooper Plastering did a fantastic job restoring my living room wall. The attention to detail was exceptional, and I really appreciated their knowledge of traditional plastering methods. The Limelight Plaster they used blends perfectly with the rest of the house, and the work was carried out quickly, efficiently, and incredibly tidily. I wouldn’t hesitate to recommend them.” Specialist Plastering for Historic Homes Cooper Plastering has extensive experience working with period properties and understands the importance of using the right materials for the job. Whether it’s a full renovation or a simple repair, we always ensure that our work enhances the beauty and longevity of a building. If you’re in Long Marston or the surrounding areas and need expert plastering services tailored to older properties, get in touch with us today: 📞 Mobile: 07754917258 📧 Email: info@cooperplastering.co.uk 🌍 Web: www.cooperplastering.co.uk Let Cooper Plastering help you restore and maintain your historic home with care, precision, and expertise!
Evesham Artex Ceiling Skim

Renovating a home can be an exciting yet daunting process, and Rebecca in Evesham is currently in the midst of transforming her property into a fresh, modern space. To begin her renovation journey, she called on the expertise of Cooper Plastering to address a few key areas in her spare bedroom, ensuring a smooth, high-quality finish ready for decorating. Transforming the Spare Bedroom Ceiling & Walls One of the major tasks involved in this project was dealing with the dated Artex ceiling. Artex, while popular in previous decades, is often removed or skimmed over in modern renovations for a sleeker, more contemporary look. The process required meticulous preparation and skill to ensure a flawless end result. The Process: Skimming Over an Artex Ceiling Preparing the Ceiling: The first step was to remove any high spots from the existing Artex texture. This ensures a more even surface for the skim coat to adhere to. Crack and Join Reinforcement: Any visible cracks and plasterboard joins were taped to prevent future movement and ensure a stable, long-lasting finish. Applying PVA Adhesion Coat: To ensure proper bonding between the existing surface and the new plaster, a layer of PVA was applied and left to become tacky. Two-Coat Plaster Application: Once the PVA was ready, we applied two coats of Gypsum Multifinish plaster. The first coat was used to level out any inconsistencies, while the second coat provided a smooth, polished finish. Final Smoothing & Polishing: Using specialist trowels, we carefully polished the plaster to achieve a perfectly flat and smooth ceiling, ready for painting once dry. Repairing Wall Damage & Enhancing Aesthetics Alongside the ceiling, we also tackled several problem areas on the walls: Holes Around Plug Sockets: Over time, electrical work and wall-mounted fixtures can leave unsightly holes. In Rebecca’s case, there were gaps around a plug socket that required careful filling and smoothing. Large Raw Plug Holes: A previously mounted mirror had left behind large holes where the raw plugs were inserted. We removed any loose debris, filled the holes with bonding material, and skimmed over them to seamlessly blend with the surrounding wall. Window Frame & Garden-Facing Wall: To achieve crisp, clean lines around the window frame, we installed metal beading, ensuring sharp, defined edges. The entire garden-facing wall was also skimmed to create a uniform, fresh appearance. Completed in One Day for Maximum Convenience One of the standout aspects of this job was our ability to complete all the work in just one day. Other plasterers had quoted Rebecca a two-day timeframe, but our efficient approach and experienced team allowed us to deliver the same high-quality result with minimal disruption. This meant Rebecca could continue with her renovation plans without unnecessary delays. Rebecca’s Testimonial “Cooper Plastering did a fantastic job in my spare bedroom. They were prompt, tidy, and extremely professional from start to finish. The team explained everything they were doing, which gave me confidence in the process. The work was completed in one day rather than the two that others had quoted, meaning less disruption for me. The pricing was very affordable, and I would highly recommend them. I will definitely be using them again!” – Rebecca, Evesham Looking for Expert Plastering Services in Evesham? If you’re in Evesham or the surrounding areas and need expert plastering services, whether it’s for a small repair or a full room renovation, Cooper Plastering is here to help. Our skilled team ensures high-quality finishes, efficiency, and customer satisfaction on every project. Contact Us Today: 📍 Website: www.cooperplastering.co.uk 📧 Email: info@cooperplastering.co.uk 📞 Mobile: 07754917258 Transform your home with Cooper Plastering – where quality meets efficiency!
Plastering In Stratford Upon Avon

Plastering in Stratford Upon Avon – Expert Services for Your Home If you’re looking for a reliable, high-quality plasterer in Stratford Upon Avon, then you’ve come to the right place. At Cooper Plastering, we provide expert plastering services across Stratford and its surrounding areas, ensuring smooth, durable, and professional finishes for homes and businesses alike. Plastering Across Stratford Upon Avon and Surrounding Areas Stratford Upon Avon is a beautiful historic town, known for its stunning architecture and rich heritage. Whether you live in Tiddington Road, Alveston, Old Town, Birmingham Road, Alcester Road, Evesham Road, Shipston Road, or Luddington, we cover all areas, offering a wide range of plastering services. What Plastering Work Have We Completed in Stratford? We have worked on numerous properties across Stratford Upon Avon, handling everything from simple repairs to full room renovations. Some of our recent projects include: Ceiling Artex Removal in Alveston – A homeowner wanted their outdated textured ceiling smoothed over. We carefully prepped the surface, skimmed the ceiling, and left a perfect finish ready for painting. Water Leak Repairs in a Kitchen in Old Town – After a leaking pipe damaged the ceiling, we replaced the affected plasterboard and reskimmed the surface, restoring it to a flawless finish. Living Room Renovation in Luddington – This involved stripping back old, damaged plaster, reboarding, and skimming to create a sleek, modern look. Garage Conversion on Alcester Road – We worked with a homeowner transforming their garage into a home office, ensuring the walls and ceiling were perfectly plastered and ready for decorating. Why Choose Cooper Plastering in Stratford Upon Avon? ✔ Local Experts – We are based in Stratford Upon Avon and understand the unique challenges of plastering in both new and period properties. ✔ High-Quality Finish – Our attention to detail ensures smooth, professional results every time. ✔ Reliable & Punctual – We pride ourselves on completing jobs on time and to the highest standard. ✔ Competitive Pricing – Get expert plastering at an affordable price without compromising on quality. ✔ Covering All of Warwickshire – Beyond Stratford Upon Avon, we also work in nearby areas such as Wellesbourne, Warwick, Henley in Arden, and Bidford on Avon. Get in Touch Today! If you need plastering, skimming, artex removal, or water damage repairs in Stratford Upon Avon, contact Cooper Plastering today! 📍 Location: Stratford Upon Avon, Warwickshire 📞 Phone: 07754917258 🌐 Website: www.cooperplastering.co.uk Get your free quote now and let us help you transform your home!
Do You Put PVA in Plaster

Do You Put PVA in Plaster? When it comes to plastering, PVA (Polyvinyl Acetate) plays a crucial role in ensuring a smooth, durable, and long-lasting finish. Many DIYers and even some professionals wonder whether PVA should be mixed directly into the plaster itself. The simple answer is no—PVA is not mixed into the plaster, but it is essential in the preparation process. Let’s break down its role and why it matters. Why Use PVA in Plastering? PVA acts as a bonding agent that helps plaster adhere effectively to surfaces. Applying PVA before plastering serves two primary purposes: Seals the Surface: It prevents porous surfaces (like brick or old plaster) from absorbing too much moisture too quickly, which could otherwise cause the plaster to dry out unevenly and crack. Enhances Adhesion: It creates a slightly tacky surface, helping the plaster bond securely to the wall. How to Use PVA Before Plastering Instead of mixing PVA into plaster, follow these steps to prepare your wall correctly: Dilute the PVA – Mix one part PVA with three parts water to create a primer. Apply the First Coat – Use a brush or roller to cover the surface with the diluted PVA mixture. Let It Absorb – Allow the first coat to dry completely. Apply the Second Coat – Mix one part PVA with one part water and apply just before plastering. When the PVA is slightly tacky, it’s the perfect time to start plastering. What Happens if You Mix PVA into Plaster? While PVA is excellent for surface preparation, adding it directly to plaster can affect the consistency and setting time, leading to: 🚫 Inconsistent drying, making plaster difficult to apply. 🚫 Potential bonding issues, weakening the finish. 🚫 Difficulty in smoothing, leading to an uneven surface. The Right Way to Ensure a Perfect Plaster Finish Instead of mixing PVA into plaster, ensure the surface is properly prepared with PVA before application. This approach guarantees a professional, smooth, and long-lasting plaster finish. Need Expert Plastering? Contact Cooper Plastering! At Cooper Plastering, we provide high-quality plastering services across Stratford Upon Avon and Warwickshire. Whether you need repairs, skimming, or a full-room plaster, we ensure a professional and durable finish. 📍 Location: Stratford Upon Avon, Warwickshire 📞 Phone: 07754917258 🌐 Website: www.cooperplastering.co.uk Get in touch today for expert plastering advice and services!
Do You Do Electrics Before Plastering?

Do You Do Electrics Before Plastering? When undertaking a home renovation or new build project, the sequence of tasks is crucial to achieving the best results. One of the most common questions homeowners ask is whether electrical work should be completed before or after plastering. The short answer? Yes, electrical work should always be done before plastering begins. Let’s explore why and how to ensure a smooth process. Why Should Electrics Be Done First? Electrical installations, whether new wiring or updates to an existing system, require chasing into the walls—cutting channels to embed cables securely. If plastering is done first, electricians would have to cut into freshly plastered walls, leading to unnecessary damage and additional repair work. The Correct Sequence of Work To ensure a seamless workflow, here’s how the process should be scheduled: First Fix Electrical Work Running new cables and wiring within walls. Installing backboxes for switches and sockets. Ensuring all cables are safely secured and in place. Plastering the Walls Once all electrical wiring is in place, plastering can proceed. Walls and ceilings are smoothed over, covering all chases and imperfections. Plaster is left to dry fully (usually 5-7 days before decorating). Second Fix Electrical Work Fitting sockets, switches, and light fixtures. Testing the electrical system to ensure safety and compliance. What Happens if You Plaster First? If you plaster before the electrical first fix, you risk: 🚫 Damaging newly finished walls when cutting out channels for cables. 🚫 Increased costs and time delays for re-plastering sections. 🚫 A messy finish, as patchwork plastering is harder to blend seamlessly. How to Ensure a Professional Finish To avoid any issues, always work with qualified electricians and experienced plasterers. At Cooper Plastering, we collaborate with local trades to ensure a flawless finish, leaving your walls perfectly smooth and ready for painting. Get Expert Plastering Services Today At Cooper Plastering, we specialize in professional plastering services across Stratford Upon Avon and Warwickshire. Whether you’re renovating a home or working on a new build, we ensure high-quality, seamless plaster finishes. 📍 Location: Stratford Upon Avon, Warwickshire 📞 Phone: 07754917258 🌐 Website: www.cooperplastering.co.uk Contact us today to discuss your plastering needs!
Where To Start When Plastering A Room
Where Do You Start When Plastering a Room? Plastering a room may seem like a straightforward task, but knowing where to start is crucial for achieving a smooth, professional finish. Whether you’re a DIY enthusiast or a homeowner looking to understand the process before hiring a professional, this guide will walk you through the best approach to plastering a room efficiently. Where Should You Start Plastering? The golden rule of plastering is to start from the top and work your way down. This ensures that any excess plaster or drips from the ceiling or upper walls can be smoothed out as you progress downwards. A standard plastering sequence typically follows this order: Ceiling (if applicable) – If you need to plaster the ceiling, always start here. Upper Walls – Begin plastering the top section of the walls. Middle Walls – Work your way down from the upper section. Lower Walls – Finish at the bottom, ensuring a smooth blend with the skirting area. Corners and Edges – Smooth out any edges, corners, or around fixtures. Step-by-Step Guide to Plastering a Room To achieve the best results, follow these steps: Step 1: Preparation ✅ Remove furniture or cover it with dust sheets. ✅ Clean the walls and remove any loose debris. ✅ Apply PVA (or an alternative bonding agent like SBR) to help the plaster adhere properly. Step 2: Mixing the Plaster ✅ Mix plaster according to manufacturer instructions. ✅ Ensure a smooth consistency with no lumps. Step 3: Applying the First Coat ✅ Start at the top of the wall and apply plaster in wide, even strokes. ✅ Cover the entire surface with a base coat, ensuring even thickness. Step 4: Applying the Second Coat ✅ After the first coat starts to firm up, apply a second, thinner coat. ✅ Use a trowel to create a smooth finish, working from top to bottom. Step 5: Finishing Touches ✅ Use a damp sponge or brush to refine edges and corners. ✅ Allow plaster to dry for 5-7 days before painting or wallpapering. Common Mistakes to Avoid 🚫 Starting from the Bottom Up – This leads to drips and an uneven finish. 🚫 Skipping PVA or SBR – Plaster might not adhere properly. 🚫 Rushing the Process – Not allowing drying time can cause cracks or poor adhesion. Why Choose a Professional Plasterer? Plastering requires skill and precision. Hiring a professional ensures a smooth, long-lasting finish without imperfections. Cooper Plastering provides expert plastering services across Stratford Upon Avon and Warwickshire, guaranteeing a flawless result every time. 📍 Location: Stratford Upon Avon, Warwickshire 📞 Phone: 07754917258 🌐 Website: www.cooperplastering.co.uk Contact us today to discuss your plastering needs!