How to Choose the Best Plasterer in Stratford-upon-Avon
Choosing the right plasterer makes all the difference. What to Look For Clean, smooth finish Good reviews Reliable communication Transparent pricing Red Flags to Avoid Very cheap quotes No references Rushed work Poor preparation Why Experience Matters An experienced plasterer will: Handle difficult surfaces Prevent future problems Deliver a consistent finish Cleanliness & Professionalism A good plasterer: Protects your home Cleans up properly Respects your space Local Knowledge Working in Stratford-upon-Avon means understanding: Older properties Damp issues Artex-heavy homes Final Advice Don’t choose based on price alone. Choose based on: 👉 Quality👉 Reliability👉 Proven results Contact Us Today Looking for a trusted local plasterer? Cooper Plastering📧 info@cooperplastering.co.uk📞 07754 917258 👉 Get in touch for a professional, high-quality finish. For Further Information Please Read: https://cooperplastering.co.uk/plastering/plastering-faq-stratford-upon-avon/
What Materials Do Professional Plasterers Use? (And Why It Matters)
The materials used can make or break a plastering job. Multi-Finish Plaster Used for: Final skim coat Smooth finish ready for paint Provides durability and a clean look. Bonding Coat Used for: Filling deep areas Levelling uneven surfaces PVA (Bonding Agent) Applied before plastering to: Control suction Improve adhesion Blue Grit Used on: Glossy surfaces Difficult backgrounds Ensures plaster sticks properly. Scrim Tape Used on: Joints Cracks Prevents future cracking. Breathable Plasters Used for: Older properties Damp-prone walls Allows moisture to escape. Why This Matters Cheap materials or poor prep lead to: Cracks Delamination Poor finish Contact Us Today We only use proven materials for long-lasting results. Cooper Plastering📧 info@cooperplastering.co.uk📞 07754 917258 👉 Get a finish that lasts. If You Have More Questions Please Visit: https://cooperplastering.co.uk/plastering/plastering-faq-stratford-upon-avon/
Can You Plaster Over Artex Ceilings? Pros, Costs & Results
Artex ceilings are common in homes across Warwickshire. Most homeowners now want a smooth, modern finish. Can You Skim Over Artex? Yes — in most cases, Artex can be safely skimmed over. Do You Need to Remove Artex? No. Removal is: Messy Expensive Often unnecessary Skimming is the preferred option. Skim vs Overboard Skimming: Cheaper Faster Minimal disruption Overboarding: Used if ceiling is poor condition Slightly more expensive Costs of Plastering Over Artex Typical ceiling prices: £250 – £600 depending on size Will the Pattern Show Through? No. A properly skimmed ceiling is completely smooth. Why Homeowners Choose This Modern clean look Increases property value Easier to decorate Contact Us Today Want rid of Artex for good? Cooper Plastering📧 info@cooperplastering.co.uk📞 07754 917258 👉 Smooth, high-quality finishes guaranteed. For Further Knowledge Please Visit: https://cooperplastering.co.uk/plastering/plastering-faq-stratford-upon-avon/
How to Repair a Ceiling After a Water Leak (Step-by-Step Guide)
Water damage to ceilings is one of the most common issues we see across Stratford-upon-Avon and Warwickshire. Here’s exactly how it should be handled. Signs of Water Damage Look for: Brown stains Sagging plasterboard Cracks or bubbling Soft spots If caught early, repairs are straightforward. When Does the Ceiling Need Replacing? You’ll need to replace plasterboard if: It’s sagging It feels soft It has mould If solid, it may just need skimming. Step-by-Step Repair Process Fix the source of the leak Allow the area to fully dry Remove damaged plaster Reboard if needed Apply scrim tape Skim for a smooth finish How Long Should You Wait Before Repairing? Usually: 👉 1–2 weeks drying time Rushing this leads to failure later. Costs of Ceiling Repairs Typical costs: Minor repair: £150–£300 Reboard and skim: £300–£600 Important Advice Plastering over damp surfaces: 👉 Will fail👉 Will stain through👉 Will cost more long term Contact Us Today If you’ve had a leak, act quickly. Cooper Plastering📧 info@cooperplastering.co.uk📞 07754 917258 👉 Fast response for ceiling repairs across Stratford-upon-Avon. Find Out More Here: https://cooperplastering.co.uk/plastering/plastering-faq-stratford-upon-avon/
How Much Does Plastering Cost in Stratford-upon-Avon? (2026 Guide)
If you’re planning plastering work, one of the first questions you’ll ask is: how much is this going to cost? As a local plasterer in Stratford-upon-Avon, we’re often asked about pricing for ceilings, full rooms, and repair work. Here’s a clear breakdown of what you can expect. Average Plastering Costs in Stratford-upon-Avon Typical prices in Warwickshire: Ceiling skim: £200 – £600 Small room: £600 – £800 Medium room: £800 – £1,000 Large room: £1,000+ These prices usually include labour and materials. Cost Per Square Metre Most plasterers charge between: 👉 £25 – £35 per m² This depends on: Condition of walls Prep work required Access and ceiling height What Affects the Price? Not all jobs are equal. Costs vary based on: Surface condition – damaged or blown plaster takes longer Artex ceilings – require extra preparation Water damage – may need reboarding Room size and layout Access and furniture removal Ceiling Skimming Costs Ceilings are one of the most common jobs: Small ceiling: £200–£300 Medium: £300–£450 Large: £450–£600 Most are completed in one day. Real Example A recent job in Stratford: Living room ceiling skim over Artex Minor crack repairs Completed in 1 day 👉 Total cost: £380 Why Cheapest Isn’t Best Choosing based purely on price often leads to: Poor finishes Visible lines and trowel marks Cracking or failure A proper job should last years, not months. Get an Accurate Quote Every property is different. The best way to price a job is to see it. 👉 For more answers, read our full guide:Plastering FAQs Stratford-upon-Avon Contact Us Today Cooper Plastering📧 info@cooperplastering.co.uk📞 07754 917258 👉 Get in touch today for a free, honest quote. Find Out More Useful Information Here: https://cooperplastering.co.uk/plastering/plastering-faq-stratford-upon-avon/
How Much Does Plastering Cost in Stratford-upon-Avon? A Local Domestic Plasterer’s Guide

If you are looking for a domestic plasterer in Stratford-upon-Avon, one of the first questions you will probably ask is simple: how much does plastering cost? The honest answer is that it depends on the size of the area, the condition of the walls or ceiling, how much preparation is needed, and whether you are looking at a straightforward skim or a more involved repair job. At Cooper Plastering, we carry out domestic plastering work across Stratford-upon-Avon and surrounding villages, including Wellesbourne, Bidford-on-Avon, Snitterfield, Tiddington, Long Marston, Alcester, Shipston-on-Stour, Warwick and Leamington Spa. Most of the work we do is for homeowners who want a proper finish that looks right and lasts. In this guide, I will explain what affects plastering costs, give realistic price ranges, and share what homeowners should think about before choosing a plasterer. Typical Plastering Costs in Stratford-upon-Avon As a general guide: Ceiling plastering A typical ceiling skim usually costs around £200 to £600, depending on: the size of the ceiling whether it is heavily cracked or damaged whether it has Artex how much prep is required whether overboarding is needed Full room plastering A full room plastering job usually costs around £600 to £1,000, depending on: room size wall condition whether the ceiling is included how much repair work is needed beforehand ease of access and furniture protection These figures are a guide only. Every job is different. A small tidy room with sound backgrounds is very different from a room with blown plaster, previous patch repairs, cracking, or water damage. What Affects the Cost of Plastering? Many people assume plastering is just a case of turning up and skimming over the top. In reality, the quality of the result often depends on what needs doing before the plaster even goes on. 1. The size of the area This is the obvious one. A small box room ceiling is not the same as a large open-plan living room ceiling. More area means more materials, more time, and more labour. 2. The condition of the surface This is where costs often change. If a wall or ceiling is already in poor condition, more preparation is needed. Examples include: cracked ceilings blown plaster water-damaged areas loose surfaces uneven previous repairs old Artex finishes A clean surface that is ready to skim will always be quicker and cheaper than a damaged one that needs cutting out, repairing, taping, sealing, or reboarding. 3. Artex ceilings Artex is still common in homes around Stratford-upon-Avon and nearby villages. In many cases it can be prepared and skimmed successfully. That is often more cost-effective than overboarding and also avoids losing ceiling height. That said, not every Artex ceiling is the same. Some need more scraping back and prep than others. Some are cracked or loose and need a different approach. 4. Water damage and repairs Leak damage is one of the most common jobs we get called to. A stain on the ceiling is not always just cosmetic. Sometimes the plaster has softened, bowed, or detached in places. Homeowners often hope it will dry out and be fine. Sometimes it will not. Wet plaster that has sagged or blown does not always recover properly. It often needs cutting out and repairing, or in some cases reboarding and replastering. 5. Access and protection A clear empty room is always easier than a fully furnished one with limited space. We still take care either way, but access affects how quickly a job can be completed. Cheapest Is Not Always Best This is one of the biggest mistakes homeowners make. It is understandable to compare quotes. Everyone has a budget. But making a decision based purely on price often leads to disappointment. Cheap plastering can mean: rushed preparation poor protection patchy repairs uneven finish corners being cut a short-term fix instead of the proper solution Sometimes the cheapest option is the easy option, not the right option. A good plasterer should think about the long-term result, not just the quickest way to get the job done. That might mean advising a full ceiling skim instead of a rough patch repair. It might mean saying a damaged area needs proper preparation rather than simply filling over it. The right job often costs a little more, but it gives a far better finish and avoids paying again later. Patch Repair or Full Replaster? This is another common question. Patch repair Patch repairs can work well in the right situation. They are useful when the damage is localised and the rest of the ceiling or wall is sound. For example: a repaired hole in a ceiling a small blown area a crack that needs opening up and repairing properly Full replaster A full skim is often the better option when: the surface has multiple defects there are visible old repairs the ceiling is dated or heavily textured you want the best visual finish you are renovating the room properly A full reskim gives a cleaner, more consistent result. It costs more than a basic patch, but aesthetically it is usually much better. Common Things Homeowners Get Wrong Over the years, I have heard all sorts of assumptions before arriving at a job. Some are understandable, but they can lead to wasted time and money. “Paint will cover it” It will not. Paint does not hide poor plaster, cracks, water damage, or rough repairs. In many cases it actually makes flaws stand out more. “A bit of filler will do” Filler has its place, but it is not the answer for larger ceiling holes, sagging sections, blown plaster, or badly damaged surfaces. “It will dry out and go back to normal” Sometimes a ceiling or wall that has been affected by a leak will dry, but that does not mean it is structurally sound or visually acceptable. Once plaster has bowed or detached, the problem often remains. “The cheapest quote is the best value” Not usually. Value is about result, reliability, cleanliness, advice, and how long the work
Plastering Over Artex Ceilings & Repairing Leak Damage in Stratford-upon-Avon
If you live in Stratford-upon-Avon or surrounding villages, chances are you’ve come across Artex ceilings, cracks, or water-damaged plaster at some point. These are some of the most common issues we deal with at Cooper Plastering — and in most cases, they can be transformed quickly and professionally within 1–2 days. Whether it’s a living room, bedroom, bathroom, or hallway, getting a smooth, modern finish can completely change the feel of your home. 📍 Areas We Cover Around Stratford-upon-Avon We regularly carry out plastering work across: Stratford-upon-Avon Wellesbourne Warwick Leamington Spa Bidford-on-Avon Alcester Henley-in-Arden Long Marston Tiddington Snitterfield Shipston-on-Stour …and all surrounding villages within a 20-mile radius. 🏠 Common Plastering Issues We Fix Artex Ceilings Artex was popular years ago, but today most homeowners want a flat, smooth finish. We offer: Skimming over Artex Scraping back high spots and re-skimming Overboarding where required Water-Damaged Ceilings & Walls Leaks from bathrooms, pipes, or roofs often leave: Stains Cracks Sagging plaster Blown or loose areas We assess the damage and either: Repair and skim Or reboard and plaster for a long-lasting result Cracks, Holes & General Wear From small cracks to larger damaged areas, we regularly repair: Ceiling holes Wall damage Poor previous plastering 🛠️ Our Process (What We Actually Do) Every job is slightly different, but a typical process includes: Preparation Protect floors and furniture Remove loose or blown plaster Scrape back Artex if needed Priming Apply PVA or bonding agent Ensure proper adhesion Repairs Scrim tape over cracks Patch damaged areas Plastering Apply Multi-Finish or Board Finish plaster Two-coat system for a smooth finish Finishing Trowelled to a clean, flat finish Ready for painting after drying ⏱️ How Long Does Plastering Take? Most standard jobs: ✅ 1–2 days (single rooms, ceilings, repairs) Larger or more complex jobs: ✅ Up to 1 week Drying time: Typically 5-7 days before painting ⚠️ Common Mistakes Homeowners Make This is where problems often get worse: ❌ Thinking paint will hide damage ❌ Using filler on large ceiling holes ❌ Leaving bowed or sagging plaster ❌ Ignoring water damage 👉 These are short-term fixes.👉 The problem almost always comes back. A proper plastering job gives you a long-term solution and better finish. 💡 Repair vs Full Ceiling Plastering – What’s Best? You usually have two options: Option 1: Patch Repairs Lower cost Good for small areas Can be blended in Option 2: Full Ceiling Skim Best finish Smooth, consistent look Adds value to your home 👉 If budget allows, we always recommend a full skim for the best result. 🧱 Skimming vs Overboarding – What Should You Choose? We often advise based on the condition of the ceiling: Skimming Over Artex Keeps ceiling height Cost-effective Works well in most cases Overboarding Used when ceilings are badly damaged Provides a completely fresh surface Slightly reduces ceiling height 👉 Both methods work — we’ll recommend what’s best for your property. 🏡 Do You Need Breathable Plaster? For most homes: ✅ Standard Multi-Finish plaster is perfect For older or period properties: ✅ Breathable systems like Limelight plaster may be required We assess each job and advise accordingly. ❓ Frequently Asked Questions How much does it cost to plaster a ceiling? Costs vary depending on size and condition. We provide free quotes based on your specific job. Can you plaster over Artex safely? Yes. In most cases, we can skim directly over Artex after proper preparation. How long before I can paint plaster? Usually 3–7 days, once the plaster has fully dried. Will plaster fix cracks permanently? Yes — if repaired properly using scrim and full skim, not just filler. Do I need to fix the leak first? 👉 Absolutely. Plastering should only be done once the source of the leak is resolved. ⭐ Why Choose Cooper Plastering? Local, reliable plasterer based near Stratford-upon-Avon Fast turnaround — most jobs completed in 1–2 days Clean, tidy, professional finish Honest advice on the best solution for your home Experienced across all property types 📞 Get a Free Quote Today If you’re dealing with Artex ceilings, cracks, or water damage, we can help. 📍 Covering Stratford-upon-Avon and surrounding villages📞 07754 917258📧 info@cooperplastering.co.uk🌐 www.cooperplastering.co.uk 👉 Get in touch today for a free, no-obligation quote
Garden Room Extension – Board and Plaster Project in Stratford-upon-Avon
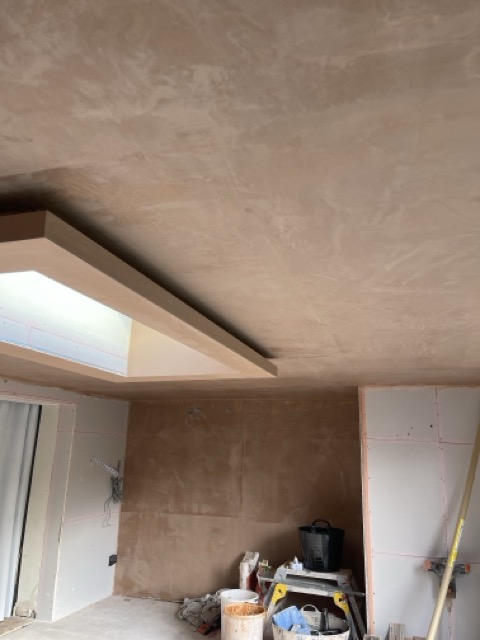
The Project Cooper Plastering recently completed a garden room extension at a property in Stratford-upon-Avon, Warwickshire. The homeowner wanted a bright new space finished to a high standard. Our goal was to deliver perfectly smooth walls and ceilings ready for decoration. Preparation and Materials Firstly, we installed plasterboard throughout the extension. Each board was carefully fitted and fixed securely using quality screws. Afterwards, we applied PVA and British Gypsum Multi-Finish plaster to create a durable, polished surface.These materials are ideal for domestic extensions because they give a strong base and a professional finish. The Process The project took four days from start to finish. The area included long walls and a large ceiling, which required steady teamwork and attention to detail. We maintained a clean workspace at every stage to protect the homeowner’s new extension.As a result, the entire room was completed quickly and efficiently without compromising quality. The Result The finished garden room looked fantastic — very clean, tidy, and smooth throughout. The client praised our hard-working team and professional approach. The extension is now ready for painting and final decoration. If you’re planning a home extension or plastering project in Stratford-upon-Avon or across Warwickshire, contact Cooper Plastering for reliable, high-quality results. 📞 07754 917258📧 info@cooperplastering.co.uk🌐 www.cooperplastering.co.uk
Bedroom Wall Repair – Charlecote Park Hotel, Warwickshire
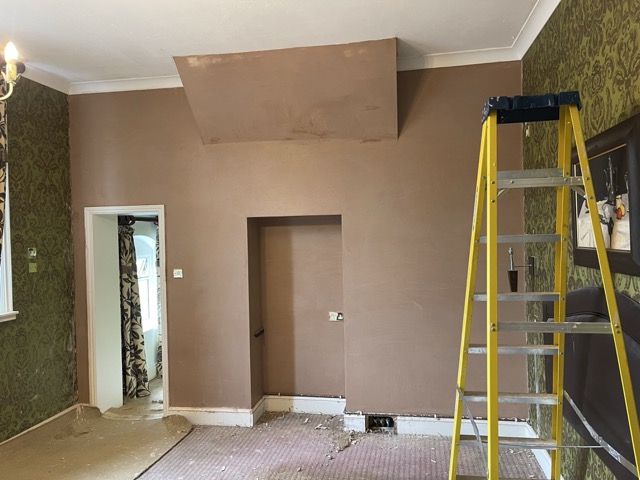
The Project Cooper Plastering was recently asked to carry out a bedroom wall repair at Charlecote Park Hotel in Warwickshire. The work needed to be completed quickly so the room would be ready for guests arriving the next day. Preparation and Materials We began by preparing the surface with PVA and scrim before applying British Gypsum Multi-Finish plaster. This ensured a smooth bond and long-lasting result. The wall stood at around 11 feet high, so extra care and precision were needed throughout the job. The Process Firstly, we set up clean protection around the area to keep the room tidy. Afterwards, we skimmed the entire wall evenly, checking for perfect flatness at each stage. The high wall required steady work and attention to detail, but everything went to plan. The Result The finish was fast, exceptionally clean, and perfectly smooth. The hotel team were delighted with how fresh the room looked and impressed by how quickly it was completed. If you need professional plastering or wall repairs for domestic or commercial properties across Warwickshire, contact Cooper Plastering today. 📞 07754 917258📧 info@cooperplastering.co.uk🌐 www.cooperplastering.co.uk
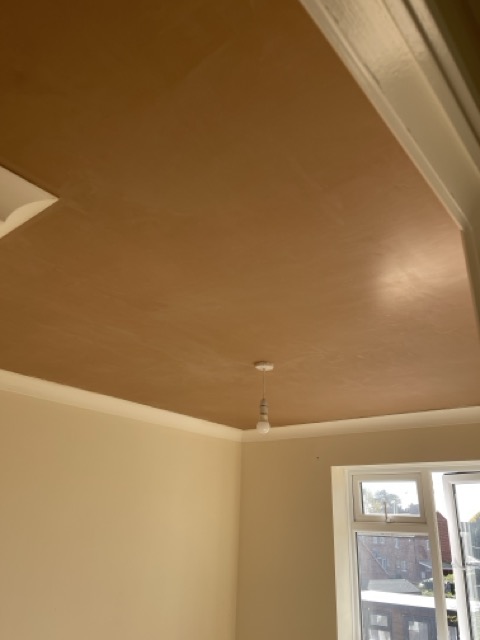
Hallway & Landing Ceiling Skim – Stratford-upon-Avon
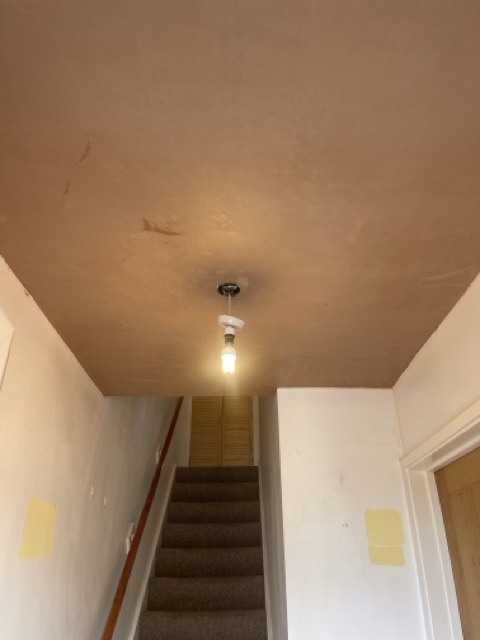
Cooper Plastering recently completed a hallway and landing ceiling skim at a property in Stratford-upon-Avon, transforming an old artex ceiling into a smooth, modern finish. To achieve the best result, the existing spiked artex was carefully scraped back before applying PVA, scrim tape, and British Gypsum Multi-Finish plaster. This thorough preparation ensured excellent adhesion and a flawless surface. The full skim was completed in just one day, leaving the homeowner with a smooth, clean, and tidy finish that completely refreshed the space. If you’re looking to remove or cover artex ceilings and achieve a perfectly smooth result anywhere in Stratford-upon-Avon or across Warwickshire, contact Cooper Plastering today. 📞 07754 917258📧 info@cooperplastering.co.uk🌐 www.cooperplastering.co.uk