Kitchen Renovation Plastering in Redditch: Damaged Walls Repaired and Re-Skimmed for a Flawless Finish
Renovating a kitchen can completely transform a home, but once the old units, tiles and fittings have been removed, the condition of the walls underneath can come as quite a shock. That was exactly the situation faced by our customer, Lee, during this recent kitchen renovation in Redditch.
After the existing kitchen had been stripped out and the electrical and plumbing alterations had been completed, the main wall was left heavily marked and uneven. Old tile adhesive covered large sections of the surface, channels had been cut into the wall for new services, and several areas needed substantial repair before the new kitchen could move on to the fitting and decorating stages.
This was not a wall that could simply be painted or covered with a quick coat of finishing plaster. It needed careful preparation, repair and levelling to create a sound background. Cooper Plastering repaired the damaged areas, filled and levelled the service chases, applied the necessary backing material and then skimmed the wall to leave a smooth, consistent finish.
The difference can be seen clearly in the before-and-after photographs. What began as a heavily damaged kitchen wall, covered in old adhesive and interrupted by deep electrical and plumbing channels, was transformed into a clean, flat surface ready for the next stage of Lee’s kitchen renovation.
If you are planning a new kitchen and need help preparing damaged walls or ceilings, learn more about our kitchen plastering services across Warwickshire.
A Redditch Kitchen Renovation That Needed More Than a Quick Skim
Kitchen renovations often reveal problems that were hidden behind cupboards, worktops, tiles and splashbacks. A wall can appear reasonably sound while the old kitchen is still in place, but the strip-out can expose years of patch repairs, layers of tile adhesive, loose plaster, redundant service holes and uneven surfaces.
In Lee’s kitchen, the wall showed many of these common renovation problems. The removal of the previous kitchen finishes had left visible adhesive lines across the lower section. Electrical work and pipe alterations had created deep chases through the centre of the wall, while other areas had been disturbed around sockets, outlets and former fittings.
The wall also contained different backgrounds and varying depths. Some sections remained relatively firm, while others needed building out to bring them back into line. Skimming directly over a surface in that condition would not have produced the durable, professional result expected from a kitchen renovation.
The first priority was therefore not appearance but preparation. A reliable plastered finish depends on what sits underneath it. By repairing and stabilising the background properly, Cooper Plastering was able to create a wall that looked dramatically better and provided a suitable surface for decorating, kitchen-unit installation and finishing work.
What the “Before” Photograph Shows
The first photograph documents the wall during the renovation, before the plastering repairs were completed. It is a useful example of why kitchen plastering requires experience and judgement rather than simply applying finish plaster over whatever has been left behind.
The wall displayed:
- Extensive residue and ridges from removed tiles and adhesive
- Deep vertical and horizontal chases for new electrical or plumbing services
- Localised holes and damaged areas around cables and fittings
- Different surface levels across the wall
- Bare and disturbed sections where the original background had been exposed
- Lower areas affected by the removal of previous kitchen finishes
- Edges and reveals requiring careful blending into the surrounding surfaces
These issues are extremely common when an old kitchen is removed. Tile adhesive can pull away pieces of the existing plaster, especially if it has been firmly bonded for many years. New sockets, lighting controls and appliance supplies may require electricians to cut channels into the wall. Plumbing alterations can add further openings, particularly when the layout of sinks, washing machines or dishwashers changes.
Each trade has an important part to play in a kitchen renovation. Once the essential services are installed, however, a skilled plasterer is needed to bring the walls back together and provide the smooth finish on which the final appearance depends.
Preparing the Kitchen Wall for Plastering
Preparation is one of the most important parts of any plastering project. Applying fresh plaster without dealing with loose material, dust, excessive suction, uneven depths or unsuitable backgrounds can lead to poor adhesion, cracking or an uneven finish.
For a wall such as Lee’s, the preparation process involves assessing every section rather than treating the entire surface as though it were identical. Loose or unreliable material must be removed. The service chases and deeper damaged areas need to be repaired and built out. Existing surfaces must then be prepared so the new materials bond correctly.
Special attention is required around cables, sockets, pipework and the edges of previous repairs. These are the points at which different materials and depths meet, so they must be treated carefully to reduce the risk of movement or visible lines appearing later.
The aim is to create a stable, reasonably level base before the finishing coat is applied. Finish plaster is designed to produce a smooth final surface; it should not be expected to bridge deep holes or correct major changes in level by itself.
That distinction is important for homeowners comparing quotations. A cheaper “quick skim” may sound attractive, but if extensive preparation and backing repairs are needed, leaving them out can compromise the result. Cooper Plastering assesses the actual condition of the walls and carries out the work needed to create a lasting, paint-ready finish.
Repairing Deep Chases and Damaged Plaster
The most obvious feature of Lee’s wall before plastering was the network of service chases. A substantial vertical channel ran down the wall, with horizontal sections branching across it. These channels were necessary for the kitchen services, but they left significant gaps that had to be filled and levelled before the wall could be skimmed.
Deep repairs generally need to be built up using an appropriate backing material. Trying to fill the full depth with finish plaster would be poor practice because finishing plaster is not intended for thick repairs. The backing work provides strength and restores the basic plane of the wall.
The surrounding damage also needed attention. When tiles and adhesive are removed, the resulting surface can contain many shallow depressions, torn edges and raised ridges. These must be dealt with so they do not show through the completed skim.
Once the repairs had been brought into line and the wall had been properly prepared, the entire area could be skimmed. This unified the different backgrounds and created one continuous surface rather than a patchwork of old plaster, filled chases and adhesive marks.
Levelling the Wall Before the Final Skim
A newly renovated kitchen relies on straight, well-finished walls. Cabinets, worktops, splashbacks, upstands and decorative finishes all draw attention to irregularities. Strong under-cabinet lighting can make hollows, ridges and trowel marks particularly noticeable.
For that reason, levelling is just as important as making the surface feel smooth. The wall needs to work visually with the new kitchen layout. While plastering cannot correct every structural variation in an older property, careful backing and skimming can make a dramatic improvement and create a professional background for the kitchen fitter and decorator.
In Lee’s kitchen, the damaged sections were built out and blended into the surrounding wall. The resulting base allowed the finishing plaster to be applied more consistently. This avoided heavy localised patches and helped create the broad, even appearance visible in the completed photograph.
The final wall no longer looked like a collection of individual repairs. The service chases, tile-removal damage and old marks had effectively disappeared beneath one continuous plastered finish.
Skimming the Kitchen Wall
Once the background was repaired, levelled and prepared, the wall was ready to be skimmed. Skimming is the final plastering stage that creates the smooth surface required for decorating.
The plaster was applied methodically across the wall, including the sections around the electrical outlets and the large opening into the adjoining dining area. The edges were worked carefully so the new finish met the existing surfaces neatly.
Achieving a good skim requires control throughout the setting process. The plaster must be applied at a consistent thickness, flattened at the appropriate time and progressively finished as it firms up. Rushing the early stages or overworking the surface later can affect the quality of the result.
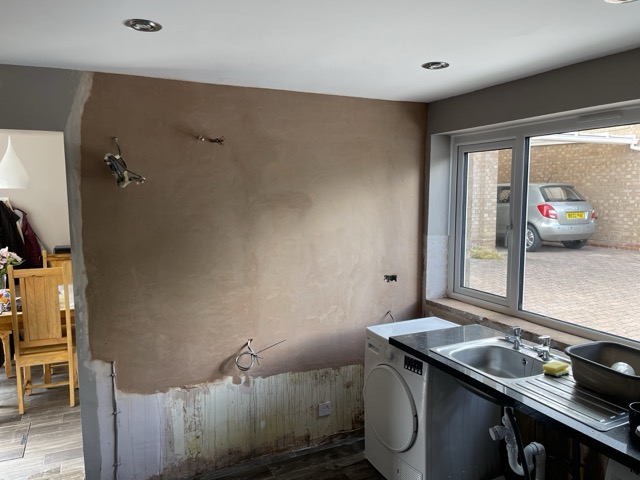
The completed wall shows an even, natural plaster finish without the deep channels, adhesive lines and damaged patches that were visible before. Once fully dry, it will provide a sound surface for suitable preparation and painting.
The Completed Result
The transformation is clear in the second photograph. The main kitchen wall has been repaired and fully skimmed, leaving a clean and consistent finish across the majority of the surface.
The large service channels have been completely incorporated into the wall. The areas affected by tile removal have been levelled, and the previously fragmented background now reads as one continuous plane. Electrical cables and outlet positions have been retained for the next phase of the installation, while the plaster has been neatly finished around them.
The wall surrounding the opening into the dining area has also been blended carefully, helping the kitchen connect more naturally with the neighbouring room. Around the window and worktop area, the fresh plaster provides a much cleaner starting point for the remaining kitchen work.
This is precisely what good renovation plastering should achieve. The plaster should not compete with the finished kitchen; it should create the smooth, reliable foundation that allows cabinets, tiles, paintwork and lighting to look their best.
Why Plastering Should Be Planned Into a Kitchen Renovation
Plastering is sometimes treated as an afterthought during a kitchen renovation. Homeowners may budget for cabinets, worktops, flooring, appliances, plumbing and electrical work but assume the walls will need little more than a coat of paint.
In reality, the strip-out stage often determines the amount of plastering required. The more the kitchen layout changes, the more likely it is that new service chases, redundant holes and disturbed plaster will need attention.
Planning the plastering stage early offers several advantages:
- The wall repairs can be completed before the new units restrict access.
- Fresh plaster has time to dry before decorating or fitting delicate finishes.
- Electrical and plumbing chases can be repaired once the relevant first-fix work is complete.
- Kitchen fitters receive straighter, cleaner backgrounds to work against.
- Tilers have a more consistent surface for splashbacks and feature areas.
- The finished room is less likely to show visible patch repairs around new fittings.
The best point for plastering is normally after the old kitchen has been removed and the first-fix electrical and plumbing work has been completed, but before the new kitchen is fully installed. The exact sequence depends on the project, so communication between the homeowner and the different trades is important.
Kitchen Wall Repairs After Tile Removal
Removing kitchen tiles can cause anything from light surface marking to extensive plaster failure. The outcome depends on the type of adhesive, the strength of the original plaster and how firmly the tiles were bonded.
In some kitchens, the old tiles come away cleanly and leave a surface that needs only limited preparation. In others, the adhesive remains in heavy ridges or pulls chunks of plaster away with it. Attempting to sand or fill a badly damaged wall may take a great deal of time and still leave an inconsistent finish.
Professional repair and re-skimming can be the most effective solution when the damage is widespread. Rather than trying to conceal dozens of individual defects, the wall can be prepared, levelled and finished as a complete surface.
This is particularly valuable when the new kitchen design includes painted walls rather than replacing all the old tiled areas. Exposed painted sections need a good finish because natural daylight, ceiling spotlights and task lighting can highlight every uneven patch.
Lee’s Redditch kitchen is a good example. The lower wall carried clear evidence of the previous finishes, while the upper and central sections had been disturbed by service alterations. Treating the wall as a complete renovation surface produced a far better visual result than a series of isolated cosmetic repairs.
Plastering Around Kitchen Electrics and Plumbing
Modern kitchens need a considerable number of services. Ovens, hobs, extractor fans, dishwashers, washing machines, fridges, sockets, lighting and other appliances all influence the electrical and plumbing layout.
When a kitchen is redesigned, the new positions rarely match every original outlet. Electricians and plumbers may therefore need to cut fresh routes through the existing walls. Once their first-fix work is complete and everything has been checked, the channels can be repaired.
Plastering around these areas requires care. Cables and outlets must remain correctly positioned and accessible, while the surrounding wall needs to be restored without leaving obvious ridges or depressions. Socket boxes should sit appropriately relative to the intended finished surface, and the plaster must be neatly formed around them.
Good preparation at this stage makes life easier for the trades that follow. Faceplates, switches and sockets sit more neatly against a flat wall, while kitchen fitters and decorators are not left trying to compensate for rough openings and broken edges.
Creating a Paint-Ready Finish
Freshly skimmed plaster provides the foundation for decorating, but it must be allowed to dry properly before paint is applied. Drying time varies according to the thickness of the repairs, temperature, ventilation and general site conditions.
Fresh plaster changes from a darker colour to a lighter, more uniform shade as it dries. Decorating should not begin while dark or damp-looking patches remain. The room should be ventilated sensibly, avoiding extreme attempts to force the drying process.
When the plaster is fully dry, it should be prepared and painted using products and methods suitable for new plaster. Homeowners should follow the paint manufacturer’s guidance or use an experienced decorator.
The quality of the plastering remains important after the kitchen is furnished. A smooth wall helps paint look consistent and reduces the amount of remedial filling or sanding required. It also gives the decorator a much better starting point for clean lines around cabinets, windows, sockets and splashbacks.
A Clean and Tidy Approach to Kitchen Plastering
Kitchen renovation work can be disruptive, particularly when several trades are working in sequence. Keeping the site organised helps the project run more smoothly and protects the rest of the home.
At Cooper Plastering, we understand that reliability and cleanliness matter alongside the finished plaster. We aim to arrive as arranged, protect the relevant working areas, complete the agreed repairs professionally and leave the space ready for the next stage.
Plastering is naturally a wet trade, but careful working practices can help control mess. Preparation, sensible material handling and a thorough clean-up all contribute to a better experience for the homeowner.
This approach is especially important in a kitchen because the room often sits at the centre of family life. Even when the kitchen is temporarily out of use, access through neighbouring spaces may still be needed. Respecting the property and coordinating with the homeowner are therefore fundamental parts of the service.
Five-Star Feedback From Lee in Redditch
★★★★★
“We were very pleased with the work Cooper Plastering carried out during our kitchen renovation. The wall was in a terrible condition after the old kitchen and tiles were removed, with deep channels for the new electrics and plumbing. Andrew repaired everything properly and left us with a really smooth finish ready for the next stage. He was reliable, professional and tidy throughout. A five-star job, and I would happily recommend Cooper Plastering to anyone needing plastering work in Redditch.”
Lee’s kitchen demonstrates why careful preparation and professional plastering make such a difference during a renovation. The final smooth wall gives the new kitchen a far better foundation and removes the visual clutter left by the strip-out and first-fix work.
Professional Kitchen Plastering in Redditch
Cooper Plastering provides professional domestic plastering for homeowners carrying out kitchen renovations in Redditch and the surrounding area.
Our kitchen plastering work can include:
- Repairing walls after kitchen units and tiles have been removed
- Filling and levelling electrical and plumbing chases
- Bonding and backing-coat repairs
- Re-skimming complete kitchen walls
- Plastering kitchen ceilings
- Repairing damaged plaster around windows and doorways
- Boarding and plastering new stud walls
- Plastering kitchen extensions and open-plan spaces
- Repairing cracks, holes and failed previous patches
- Preparing walls for painting, splashbacks and the next installation stage
Whether the project involves a single damaged wall or a complete kitchen and dining-room renovation, the objective remains the same: a strong, smooth and professionally finished surface.
Serving Redditch and the Surrounding Area
This project for Lee forms part of Cooper Plastering’s work across Warwickshire and nearby parts of Worcestershire. We welcome enquiries from homeowners in Redditch and surrounding communities, including Headless Cross, Crabbs Cross, Webheath, Batchley, Walkwood, Greenlands, Oakenshaw, Astwood Bank, Studley, Mappleborough Green and Feckenham.
We also work across Stratford-upon-Avon, Alcester, Henley-in-Arden, Wellesbourne, Warwick, Leamington Spa and other towns and villages throughout the wider area.
For customers searching for a plasterer in Redditch, kitchen plastering in Redditch, kitchen wall repairs near Redditch or plastering after tile removal, Cooper Plastering offers experienced, straightforward help with domestic renovation work.
Why Choose Cooper Plastering?
Choosing the right plasterer is important because the quality of the finish will remain visible long after the renovation has been completed.
Customers choose Cooper Plastering for:
- More than ten years of plastering experience
- Hundreds of happy customers throughout Warwickshire and the surrounding area
- Careful preparation and attention to damaged backgrounds
- Smooth, high-quality finishes ready for decorating
- A clean, tidy and respectful approach
- Reliable communication and straightforward quotations
- Experience with kitchen renovations, wall repairs and full-room re-skimming
- Domestic plastering for projects of many different sizes
We take pride in doing the preparation properly and delivering a finish that supports the rest of the renovation.
Frequently Asked Questions About Kitchen Plastering
Can you plaster a kitchen after the old units and tiles have been removed?
Yes. This is often the ideal stage to assess and repair the walls because the damaged areas are visible and accessible. Electrical and plumbing first-fix work should generally be completed before the final plastering begins.
Can you repair deep channels left by electricians and plumbers?
Yes. Service chases can be filled and levelled using suitable materials before the wall is skimmed. The exact repair method depends on the depth, width and condition of the surrounding background.
Can you skim straight over old tile adhesive?
It depends on the condition and type of the existing surface. Loose material and unsuitable high spots must be removed, while the remaining background needs appropriate preparation. A site assessment is the safest way to determine the correct approach.
Should the kitchen be plastered before the new units are installed?
In many renovations, plastering is best completed after the strip-out and first-fix services but before the new kitchen units are fully fitted. This provides access to the walls and allows the plaster time to dry.
How long does new kitchen plaster take to dry?
Drying time varies with the depth of the repairs, room temperature, ventilation and weather conditions. Fresh plaster should be allowed to dry naturally and fully before it is decorated.
Do you plaster kitchen ceilings as well as walls?
Yes. Cooper Plastering can skim and repair kitchen walls and ceilings, subject to an assessment of the existing surfaces and the work required.
Can you quote from photographs?
Photographs can be useful for an initial discussion, but a site visit may be needed where there is extensive damage, uncertain backgrounds or a larger renovation. This allows the scope of the repair to be assessed accurately.
Do you cover Redditch even though you are based near Stratford-upon-Avon?
Yes. Cooper Plastering works throughout Warwickshire and in surrounding areas, including Redditch and nearby communities.
Planning a Kitchen Renovation in Redditch?
If your old kitchen has been removed and the walls are covered in tile adhesive, service chases, damaged plaster or previous patch repairs, Cooper Plastering can help prepare the room for its next stage.
As Lee’s project shows, even a severely marked and uneven wall can be transformed with the right preparation, backing repairs and professional skimming. The result is a smooth, consistent surface that gives the new kitchen the quality foundation it deserves.
Visit our Kitchen Plastering in Warwickshire page for more information about kitchen wall repairs, ceiling plastering, renovation work and complete re-skimming.
Contact Andrew for a free, no-obligation quotation:
Andrew Cooper
Cooper Plastering
Warwickshire Domestic Plastering Specialists
Mobile: 07754 917258
Email: info@cooperplastering.co.uk
Website: www.cooperplastering.co.uk
Based near Stratford-upon-Avon and serving Redditch, Warwickshire and surrounding areas